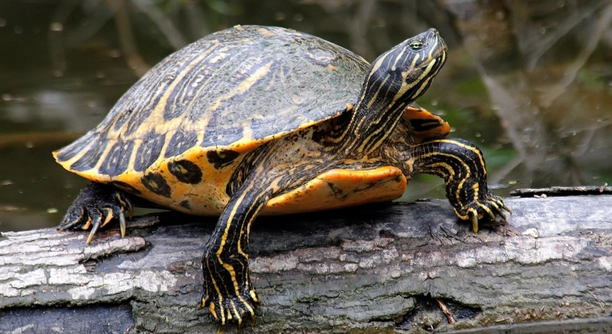
Cleaning a cooter turtle’s shell requires a careful approach to avoid harm. Maintaining a clean shell is important for the turtle’s health and well-being, so it’s essential to handle the process with care.
To safely clean a cooter turtle’s shell, gently scrub it using a soft brush and lukewarm water. Avoid harsh chemicals and ensure you clean all the nooks and crannies without causing any damage to the shell’s surface.
By following the right steps, you’ll ensure your turtle’s shell stays clean and healthy without causing stress. Continue reading for a step-by-step guide on how to do this properly.
Step 1: Gather the Necessary Cleaning Supplies
Before starting, make sure you have everything ready. You’ll need a soft toothbrush, a small bowl of lukewarm water, and some mild soap. Avoid using harsh cleaners or chemicals that could harm your turtle. You should also have a towel to dry your turtle afterward and keep its environment comfortable. It’s important to ensure you don’t stress out the turtle during the cleaning process. Having the right tools makes everything go smoothly and safely.
This step is simple but necessary for a safe cleaning routine. Make sure all the supplies are within reach so you don’t have to leave your turtle unattended.
Having the right supplies can make a big difference when cleaning a turtle’s shell. The soft toothbrush is essential for getting into the small crevices and scrubbing off any dirt or algae buildup. Lukewarm water is gentle on the turtle’s skin, which is important since they can be sensitive. Soap should be used sparingly; a tiny drop is enough to remove stubborn grime. Always remember that less is more when it comes to products, and being gentle with the turtle is key.
Step 2: Gently Remove Your Turtle from Its Habitat
Once you’ve prepared the supplies, carefully take your turtle out of its tank. Handle it gently and support its body as you lift it. Ensure that you are calm and steady, as sudden movements could startle your turtle. This step is crucial for the turtle’s safety.
After removing your turtle, place it on a flat, clean surface, like a towel or a safe mat. This helps keep it stable while you clean. You should never leave it on an unstable surface.
Moving your turtle to a safe, clean area is a big part of the process. It will help avoid any risk of slipping or injury. Place the turtle on a flat surface that can be easily cleaned afterward. It’s important to make sure the environment is free of distractions so that you can focus on cleaning.
Step 3: Rinse the Shell with Lukewarm Water
Start by gently rinsing the turtle’s shell with lukewarm water. This helps loosen any debris or dirt stuck to it. Avoid using cold or hot water, as it can shock the turtle’s system. A steady, calm flow of water will make the cleaning process easier.
Rinsing with lukewarm water helps to remove any loose dirt, algae, or waste on the turtle’s shell. Make sure you get both the top and bottom of the shell, as dirt can gather in the crevices. It’s important to rinse gently, ensuring that the water doesn’t irritate the turtle. Keep the water level low to avoid submerging the turtle entirely.
While rinsing, focus on the areas that may need extra attention. Pay close attention to the areas around the edges of the shell where algae can grow. These spots can be tricky to clean, but rinsing them thoroughly should remove most of the buildup. After rinsing, the turtle should look cleaner, but you’re not done yet.
Step 4: Scrub the Shell Using a Soft Toothbrush
Next, take your soft toothbrush and begin gently scrubbing the shell. Use small circular motions to clean off any dirt or algae that remains. Be extra careful around the scutes (the hard, scale-like parts of the shell) as you don’t want to damage them.
Scrubbing with the toothbrush is the key to thoroughly cleaning the shell. Focus on the edges and any rough spots where debris may be stuck. Gently scrub each area for a few seconds. Don’t use excessive pressure, as the shell can be fragile, especially around the edges. Be patient, as some areas may need more scrubbing than others. Avoid over-scrubbing, as this could wear down the shell’s surface.
For a more effective cleaning, make sure to scrub the underside of the shell as well. The soft brush should get into the grooves without causing harm. Once you’ve cleaned the entire shell, you can rinse the turtle again with water to remove any loosened debris.
Step 5: Use Mild Soap if Necessary
If there’s stubborn grime that won’t come off with water alone, you can use a tiny drop of mild soap. Make sure the soap is non-toxic and safe for animals. Apply it carefully with the toothbrush, but avoid overusing it.
Be cautious with the soap to prevent any harmful residue on the turtle’s shell. After scrubbing with soap, rinse thoroughly to make sure no soap remains. Soap should only be used when needed and in minimal amounts. This step ensures a deeper clean without risking the turtle’s health.
Step 6: Dry the Turtle’s Shell
After cleaning, use a soft towel to gently pat the turtle’s shell dry. It’s important to avoid rubbing the shell too hard, as this could cause discomfort. Be sure to dry both the top and bottom of the shell.
Gently drying the turtle’s shell helps prevent water from collecting in the crevices. If the turtle stays wet, it may develop bacteria or mold over time. The drying process also keeps the turtle comfortable. You should leave the turtle in a warm, dry area for a little while to ensure it’s completely dry.
Step 7: Return the Turtle to Its Habitat
Once the shell is dry, gently return the turtle to its habitat. Make sure the tank or enclosure is clean and the water is at the right temperature. It’s essential to ensure the turtle feels safe and comfortable after the cleaning process.
Place the turtle back into its habitat carefully, observing its movements. Make sure the environment is calm and quiet so the turtle can adjust without stress. This step ensures that the turtle remains healthy and happy after its cleaning.
FAQ
How often should I clean my cooter turtle’s shell?
You should clean your cooter turtle’s shell as needed, typically once every 2 to 4 weeks. If you notice algae, dirt buildup, or any unusual odors, it may be time for a cleaning. However, over-cleaning can be stressful for the turtle, so it’s important not to clean it too frequently. If the turtle lives in a clean, well-maintained environment, it may not require frequent cleanings. Regularly checking the shell for debris or signs of algae growth can help you determine the best cleaning schedule.
Can I use regular soap to clean my turtle’s shell?
No, regular soap can contain harmful chemicals that may harm your turtle. Always use a mild, non-toxic soap if you feel it’s necessary for cleaning. Harsh soaps or cleaners can leave residues that are harmful to the turtle’s sensitive skin. Even mild soaps should be used sparingly, and always make sure to rinse the shell thoroughly to remove any soap residue. Many pet stores sell animal-safe soaps designed for cleaning turtles, which are safer options to use. When in doubt, it’s better to clean with just water.
Is it okay to soak my turtle in water to clean the shell?
Soaking a turtle for cleaning is not ideal, as it can stress the animal. While rinsing its shell with lukewarm water is fine, prolonged soaking isn’t necessary and can be uncomfortable for the turtle. Always support your turtle during the cleaning process, making sure it is not submerged for too long. If your turtle enjoys soaking in its habitat, it can do so at its own pace, but don’t force it into water during cleaning. The goal is to keep the turtle comfortable throughout the process.
How do I clean algae off my turtle’s shell?
Algae can often build up on a turtle’s shell, especially if it lives in a tank with poor water quality. The best way to clean algae is to gently scrub the shell with a soft toothbrush. A small amount of mild soap may help if the algae is stubborn, but always make sure to rinse well afterward. Be careful not to scrub too hard, as this could damage the shell. Regular water changes and maintaining a clean habitat can help reduce algae growth. Some turtles may also naturally shed some algae over time.
Can I use vinegar to clean my turtle’s shell?
Vinegar should be avoided when cleaning your turtle’s shell. While it is a common household cleaner, it’s too acidic and can irritate the turtle’s sensitive skin. Vinegar can also harm the shell’s natural coating. Instead, stick to lukewarm water and a soft toothbrush for regular cleaning. If you need something stronger, opt for a mild, non-toxic soap or animal-safe cleaner. Always prioritize your turtle’s well-being by avoiding harsh chemicals in its cleaning routine.
Should I clean the underside of the turtle’s shell?
Yes, it’s important to clean the underside of your turtle’s shell as well. This area can collect debris, algae, and waste, just like the top of the shell. Be gentle while cleaning the underside, using a soft toothbrush to avoid causing harm. Pay attention to the edges where the shell meets the soft skin, as these areas are more sensitive. Rinsing thoroughly afterward will ensure no soap or debris remains. Keeping the underside of the shell clean helps promote the overall health of the turtle.
What should I do if my turtle’s shell is cracked or damaged?
If you notice a crack or injury on your turtle’s shell, it’s important to seek veterinary care immediately. A damaged shell can lead to infections, which may worsen over time if not treated properly. You should not attempt to clean or treat the injury yourself unless directed by a veterinarian. In the meantime, avoid handling the turtle too much to prevent further stress or injury. Your vet will recommend the best course of action, which may include antibiotics or other treatments to prevent infection.
How can I keep my turtle’s shell healthy?
Keeping your turtle’s shell healthy involves more than just cleaning. Make sure it has a balanced diet that includes the right amount of calcium and other nutrients to promote shell growth. Regularly check the water quality in your turtle’s habitat, as poor water conditions can lead to shell problems. Avoid rough handling of your turtle, as this can cause stress or damage to its shell. Providing UVB lighting in its enclosure will help maintain proper shell and bone health. A clean, safe environment is key to ensuring your turtle’s shell remains strong and healthy.
Is it normal for my turtle to shed parts of its shell?
Yes, shedding is completely normal for turtles. As they grow, they periodically shed the outer layers of their shell in a process called ecdysis. This is a natural part of their development and doesn’t typically cause harm. The shedding process may be more noticeable if the turtle is healthy and receiving a proper diet. You may see small, loose pieces of the shell fall off, but these should not be large or cause any lasting damage. If you notice any unusual shedding or if your turtle seems uncomfortable, consult a veterinarian for advice.
How can I prevent algae from growing on my turtle’s shell?
To prevent algae growth on your turtle’s shell, it’s important to maintain clean water in its tank. Regular water changes and the use of a water filter will help minimize algae buildup. You can also adjust the lighting to prevent algae from thriving. Excessive light can encourage algae growth, so having the right amount of UVB light for your turtle’s health is important, but too much can promote algae. Regularly cleaning your turtle’s shell will also prevent algae from accumulating. A clean and balanced environment is key to avoiding algae growth.
Final Thoughts
Cleaning a cooter turtle’s shell is an important part of maintaining its overall health and well-being. While the process may seem simple, it’s essential to approach it with care. The right tools, such as a soft toothbrush and mild soap, help ensure the turtle’s shell stays clean without causing harm. Regular cleaning can prevent algae buildup and dirt, which can affect the turtle’s skin and shell. However, it’s important to strike a balance—cleaning too frequently or too harshly can stress the turtle, so make sure to clean only when necessary.
Besides cleaning, other factors contribute to your turtle’s health. A proper diet that includes enough calcium helps in the growth and strength of its shell. Providing the correct environment, with clean water and appropriate lighting, is just as important. The tank should be cleaned regularly, and the water should be changed often to prevent the buildup of harmful substances. UVB lighting supports the turtle’s shell and bone development, making it a vital part of its care routine. By ensuring a safe, healthy habitat, your turtle can live a long, happy life.
Lastly, always remember to handle your turtle gently and respectfully during cleaning. Stressing the turtle or causing harm while cleaning can lead to health issues. If you notice any damage or unusual changes to the shell, such as cracks or discoloration, it’s best to consult a veterinarian. Keeping up with routine shell cleaning, providing the right habitat, and observing your turtle’s health can help ensure that it stays healthy and comfortable for years to come.

Hello,
If you enjoy the content that we create, please consider saying a "Thank You!" by leaving a tip.
Every little bit helps us continue crafting quality advice that supports the health, happiness, and well-being of pets around the world, for pets of all shapes, sizes, and species.
We really appreciate the kindness and support that you show us!